Proper Golf Driver Setup
Contents
- 1 Proper Setup for Driving with Power & Consistency
- 2 8 Steps to the Perfect Golf Driver Setup
- 2.1 Step 1: Place the club on the ground
- 2.2 Step 2: Place your feet together
- 2.3 Step 3: Move your left foot
- 2.4 Step 4: Move your right foot
- 2.5 Step 5: Make sure the ball is the correct distance away
- 2.6 Step 6: Even out your balance
- 2.7 Step 7: Closing your shoulders
- 2.8 Step 8: Hand position
- 2.9 Conclusion
Proper Setup for Driving with Power & Consistency
The setup is key to any golf shot, it’s especially important with the driver setup. Mess up a drive, and you’re a long way in trouble, whether that is rough, the next fairway, or the trees.
Also, the best swing in the world doesn’t mean a thing, unless the setup is able to match it, such is the importance of a proper golf driver setup.
In this article you’ll discover how to properly setup for hitting the driver, so you can hit with confidence and consistency. So sit back, grab a coffee and enjoy!
8 Steps to the Perfect Golf Driver Setup
There are several key steps for a golf driver stance setup routine. You’ll need to follow these before every single shot with your driver, in order to setup in the best possible way.
Step 1: Place the club on the ground
Placing the driver on the ground before anything else is really important. This allows you to aim the club directly at the target. This is a basic alignment tip; you should not be aiming your body at the target here. Your body should be aimed slightly to the left of the target.

Step 2: Place your feet together
Whilst aiming the driver at your target, place your feet together so that the ball is in the middle of your stance. This helps you concentrate on lining up your drive to the target.
Step 3: Move your left foot
The next step is to move your left foot out slightly to the left. Enough so your foot is in-line with your left shoulder. This is an important step as the stance varies in width according to the length of each club. The best way to perfectly setup your stance every time is to move your left foot out and then move your right foot out depending on the length of the club you’re hitting with.
Step 4: Move your right foot
Next you’ll want to move the right foot out as well. You’ll want to move the right foot out enough so that it is in-line with the outside of the right shoulder. This is the widest stance of all the clubs, because the driver is obviously the longest of all the clubs in your bag.
The longer your club the wider your swing, with a wider stance you have more balance to accommodate the wider swing. Not only that, the more balance you have the more power you can generate on each of your drives.

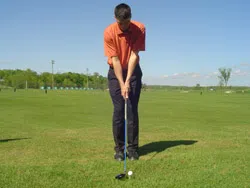
Step 5: Make sure the ball is the correct distance away
Now you need to check whether the ball is at the correct distance away from you and your stance. Start by placing the club-head just behind the ball, then you take your right hand off the grip of the club, and then place it between the butt end of your club and your belt or waistline.
If your hand fits nice and snug between the two, you have yourself the correct distance from the ball. The distance away is very important. Too close can lead to a steep swing plane, and too far it can (yes you guessed it) lead to a much wider swing plane. Too much either way will cause you to duff your shots. Get the distance right, and feel comfortable, that’s the most important thing.

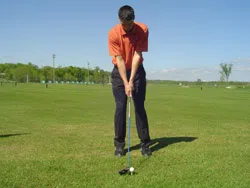
Step 6: Even out your balance
In your driver setup your balance needs to be spread evenly through your feet. The same weight needs to be placed on the toes as it is on the heels. By doing this you’re planting a solid platform for a good solid and consistent swing, which is what you’re going to need to hit that driver the way you’re dreaming about.
While you’re in your swing position, you should also make sure that your back is straight. Any curvature in the spine will increase the difficulty of a smooth faultless swing.
Special Tip: To make sure that your balance is right and your back is straight, stick your butt out behind you. This ensures the weight in your feet is correct and also gives your back more support to straighten. Ensuring your feet are correctly balanced and your back is straight will increase the angles in your stance, creating much cleaner consistent hitting. Just give it a whirl!

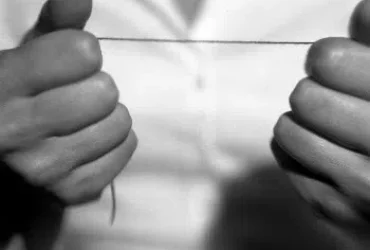
Step 7: Closing your shoulders
Nearly there, just one more to go for your perfect driver setup. In this sequence you will be making sure your shoulders are closed throughout your swing. Now, all you need to do here is to imagine viewing yourself from your right hand side, or you can get a friend to spot you if you like, however it’s easy enough on its own.
Then move your left forearm ever so slightly in front of your right. You can do this simply by tucking your right elbow in. If you can imagine this then you will see how your left shoulder will pop out ever so slightly. This closes your shoulders throughout your swing. If you didn’t do this, your shoulders would be open, which would increase the chances of hitting a horrible slice.

Step 8: Hand position
This is the last step on your way to practicing the perfect golf driver setup. Now, what you need to do to finish off this setup routine is to get your hands in the correct place. So, what is the right hand position at address with the driver?
A good tip for this I use and a lot of professional teachers use too is to imagine if you were to let your club drop back. The club should hit the inside of your front standing leg which, for the right handed golfer, is the left leg.
Check this out: The best training aid for hand position
The left leg situation is exactly the same for all shots you hit, no matter what club you’re using, so remember that one! To also check that your hand position is correct, your hands should be ever so slightly behind the ball, and in some cases just about even with it.
Conclusion
Well, that’s it for now; hope you’ve enjoyed this quick run through on a proper golf driver setup. The important things to remember here are balance, position, and direction. As long as you follow the accompanying steps covered above, you’ll be on your way to hitting your driver clean off the tee every time.
However!
If you still need a hand, here is a fantastic video from Rick Shiels on the ‘perfect’ driver setup!


