How to Hit a Driver: 10 Steps to Straight, Long Drives

Hitting a driver straight and far is a critical part of the golf game! A great drive sets up a fantastic hole, while a terrible drive can be almost impossible to overcome.
Many golfers feel the driver is the most difficult club to master. Unlike irons, woods, and hybrids, the driver is a specialty club that requires its own unique set up and swing. This means you use the driver less on the course than other clubs and fewer repetitions leads to slower progress and less confidence!
Fear not. In this article we provide the 10-steps for hitting straight drives. And guess what? When you hit straight drives, you hit longer drives.
Contents
10 Steps to Straight and Long Drives
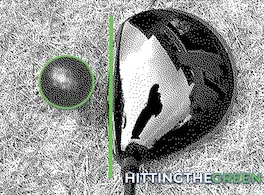
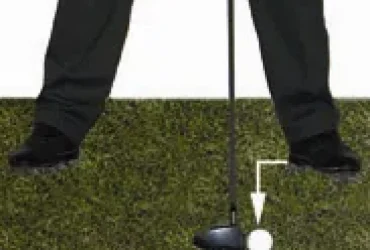
Step 1 | Tee the Ball

This one’s easy! Just tee up the ball so half of the ball is above the top of the driver. Teeing the ball at this position gives you more loft and less spin which translate to straight and long drives.
Step 2 | Plan Your Shot
A big mistake made by many golfers is lack of planning, and they make this mistake most often when hitting their driver. 99% you want to end up on the fairway. But that isn’t quite specific enough.
Stand behind the tee and pick a spot on the fairway where you want your ball to land. Choose your target.

Think about each shot of the hole–not just the drive. How will your drive set up the following shots? What is your plan, stroke-by-stroke, to get on the green and avoid hazards? How does each of your planned shots match up with your strengths and weaknesses? Your target should take all of these factors into account.
Next, draw a target line. Still behind the tee, imagine a straight line from the tee to your target. This is the “target line”.
Now find a visual marker along the target line that’s 5 to 10 yards away from the tee. Your visual marker could be a leaf or a divot. You could even lay down a coin or ball marker (just make sure to pick them up after!)
You will aim for this visual marker as you attempt to drive the golf ball straight along this target line!
Step 3 | Position Your Feet
Position your feet slightly more than shoulder width apart for greater stability and balance in your swing.
Your weight should be on the arches of your feet, not the balls or heels.
Point your feet forward toward the ball with little or no flare. If you draw an imaginary line outward from your toes, it should cross your target line at a 90-degree angle. This positioning maintains alignment with the target line, contributing to a straight drive.
Step 4 | Position the Ball

The driver is the longest club in your bag. It requires a different swing and different ball positioning. For straighter, longer drivers, you should position the ball “forward” in your stance. This means positioning the ball in line with the inside ball of your front foot.
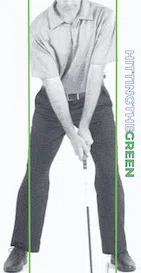
Step 5 | Position Your Body
Position your hips, knees, and shoulders parallel to the target line. Golfers sometimes call this “squaring up”.
Shift your weight slightly toward your back foot (60% back foot, 40% front foot). Bend your knees and hips slightly. Straighten your back as much as possible. Stick your butt out just a little. Position your sternum (the center bone in your chest) in line with the back of the head of your driver.
Your arms should hang straight down from shoulders. Imagine a line running from your shoulders through your hands and into the ground. That line should meet the ground at a 90-degree angle.
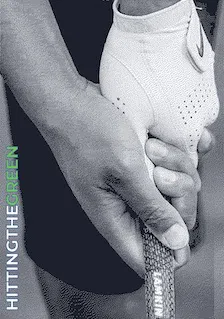
Step 6 | Grip & Club Position
Place your hands high on the driver near the end of the grip. No more than a half inch (1.3 centimeters) of the grip should be exposed past the end of the palm of your hand.
Place your front hand (also called your “lead”, “down range”, or “weak” hand) first. Your thumb should point straight down the driver shaft toward the club head.
Place your back hand below your front hand on the grip (toward the club head). This hand should be touching the lead hand. It is common for golfers to even overlap or interlock the index finger of the lead hand with the pinky finger of the back hand. Squeeze the grip with medium strength.
Place the driver’s club head “square” with the target line. This means that the face of the driver should intersect the target line at a 90-degree angle.
Lay the club head flat so you’re using the driver’s loft as intended. Only advanced golfers should modify the position of the club head to manipulate their drives.
The grip of the driver should point at your belt line and be distanced about 12 inches (30 centimeters) from that point. There should be about a hand’s length between your thighs and your hands.
Move closer or further away from the ball to maintain this body position and posture as needed (while also keeping the golf ball aligned with the inside of your front foot!)
Step 7 | Relax
Golfers, whether beginners or advanced, tend to feel pressure and anxiety when hitting their driver. This is natural because the drive is such an important shot (and you often have spectators!).
We often tense up when feeling pressure and anxiety, and these are the enemy of a smooth, fluid swing. So you’ve got to relax before you swing!
Waggle the club back and forth. Moving your fingers and feet will keep you loose. Take a few smooth, deep breaths. Focus on your breathing, posture, and target line.
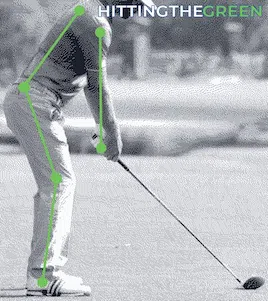
Step 8 | The Backswing
Slowly draw the club backward. A quick backswing often pulls golfers out of alignment with the ball and their target line.
Shift your weight toward your back leg.
Rotate your shoulders around your spine. Your lead shoulder should rotate all the way underneath your chin.
Pause briefly at the top of your backswing.
Step 9 | The Downswing and Impact
Begin your downswing.
Rapidly drop your club head toward the ball, keeping your lead arm straight. Begin shifting your weight forward on your feet and rotating your shoulders around your spine.
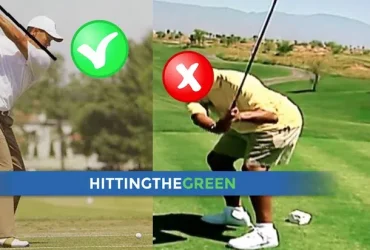
Your goal is to strike the ball evenly with the center of the face of your driver–the sweet spot. At impact, the face of the club should be at a 90-degree angle to your target line. This is sometimes called hitting the golf ball “square”.
The moment of impact should be just as your driver head has passed the lowest point of your swing. In other words, contact should be just at the point that the club head begins to rise as you begin the follow-through. This is sometimes called “sweeping” or “whipping” the golf ball.
At impact, begin to rotate your hips around the center line of your body defined by your spine and toward your target.
If you notice a loss of balance during your swing, you’re swinging too hard.
Remember, higher club speed only matters if you make good contact, so focus on a smooth swing for a straight drive. As you master straight drives, you will be able to increase your club speed which will improve ball speed and thereby increase drive distances.
Step 10 | The Follow-through

Your drive isn’t complete at the moment of contact! Your follow-through plays a crucial role in the straightness and distance of your drive.
After impact, continue rotating your shoulders and hips. Continue shifting your weight from your back leg to your font leg. These rotations complete when your chest is facing downrange toward your target and your back heel has lifted slightly off the ground.
Stretch your arms out through the initial phase of the backswing and allow the club head to rotate around your body as your weight shifts forward and you rotate your hips and shoulders. The club head should not move straight up!
Continue stretching, reaching, and straightening the arms as the club head rises to the height of your shoulders.
The follow-through concludes by bending the elbows to allow the club to move behind your head, reaching a final resting posting behind your neck and roughly parallel to the ground.
Driving Common Questions
How do I increase my driving distance?
.. and How do I drive a golf ball 300 yards?
.. and How do I drive a golf ball 400 yards?
Once you’ve mastered the basics, driving distance is dictated by reduced spin on the ball and increasing club speed to produce high ball exit speeds. The bottom line is this will take practice. Lots of it. Swinging your driver must become second nature. Additionally, you’ll need to work on your strength so that you can maintain your form as you swing faster.
Remember, the average driver distance of a scratch golfer is 250 yards for men and 210 yards for women. These are the best golfers on the course. So it is very rare for golfers to be able to consistently hit 300 yard drives, let alone 400 yard drives. The upper limit of your driving potential will be dictated by size and strength. You can cross train for strength, but there isn’t much you can do about size!
Why can’t I drive a golf ball straight?
Straight drives are achieved by striking the ball square and on the sweet spot. The entire swing of your driver is geared toward this goal. If your drives aren’t flying straight, you’re either slicing or hooking the ball. Don’t worry, these articles will help you fix those problems for good:
Is driving a golf ball easy?
Driving a golf ball is not easy for most people. It takes consistent and deliberate practice. Fortunately, if you follow our 10 step process, you will learn to consistently drive the ball straight and far.
How do you drive a golf ball straight every time?
You can’t. Even PGA golfers occasionally slice or hook drives. So don’t expect that you will drive the ball straight every time. However, you can definitely improve your consistency. You must first understand what a proper driver swing is, which we show you in 10 easy steps. Next, you must practice consistently and deliberately.
How can I improve my driving skill in golf?
To improve your drive, you need to understand what a proper driver swing looks like, what you’re doing when you swing your driver, and closing the gap between the two. To understand what a proper driver swing looks like, check out our 10 step process for driving the golf ball straight and far. Next, practice consistently and deliberately. Take video of yourself hitting multiple drives so that you can analyze your swing and understand what isn’t working.
What is the proper golf driver setup position?
- Tee the ball up so that half of it sits above the driver head when laying it flat.
- Position your hips, knees, and shoulders parallel to your target line.
- Place the driver’s club head “square” with the target line.
- Position your feet slightly more than shoulder width apart.
- Point your feet forward toward the ball with little or no flare.
- Position your hips, knees, and shoulders parallel to your target line.
- Bend your knees and hips slightly.
- Straighten your back as much as possible.
Check out HittingTheGreen’s 10-step process for hitting far and straight drives for more!
BONUS: Golf Driving Videos!
As if our 10-step process wasn’t enough, we’ve compiled a list of the best videos on the internet to help you improve your drives!
